
|
|
Copyright © 2001-2023
|
|
Surveying in Underwater CavesCompass:In surveying underwater caves, I use an oil-filled compass with a rotating bezel that can be bought at
Recording Data:I record all my data using wet notes, as well as decompression profiles and other notes. I never erase anything and just fill them up and store them. You never know when you might have to retrieve information, and they can be entertaining later on!
For this reason, many underwater surveyors prefer to mount the compass on a slate. It has the advantage of being a little more stable in the water, and the edge of the slate can be used to line up with the guideline as you survey. It also keeps the notes and compass in one place, reducing task loading.
The disadvantage to a slate is it's rigid and bulky, and not always easily stored. You are limited on the amount of data you can collect by the slate size and it can be cumbersome flipping the slate over and over when writing data on the back. All in all though, I would recommend starting out with the slate until you gain experience. Top Measuring Tapes:For distances, many underwater surveyors use knotted line. Most of the maps available today were done using this method, and it can be very accurate when done properly. My experience has been that it takes a lot of concentration and it is very easy to get distracted and lose count, especially when combined with cave diving. When I need foolproof accuracy, I use standard, fiberglass surveying tapes in 50 foot and 100 foot lengths. The smaller one, shown below, is great for sidemount dives or tight nasty crawlway. Note the removable brass double-ender to secure the tape while not in use, and the bungee retainer that prevents the tape from unwinding and causing an entanglement hazard.
Sonar:
Another handy feature available on some models is the ability to hold down the button and get a continuous read-out of distances. This is useful on irregular surfaces where you may get readings from different parts of a surface. Data Reduction:I use OnStation to crunch all the data, just type it in and the program does all the tedious calculations. The advantage to OnStation is it is very easy to get started. It's fairly intuitive and you can begin entering and using data immediately. It does have some quirks to it though. The biggest one is that it only recognizes side wall information in meters, even if you set units to feet. If you enter the data in feet, the passage sides are much larger than they should be since it is showing them in meters. The work around is to convert the sidewall to meters or to set your units to meters and enter all the measurement in feet. This makes the survey look "right" proportionally, but can cause issues if you export the file. The other option is to enter everything as meters. Converting sidewall to meters is easily done in Excell or any spreadsheet program. Its easy to cut and paste into OnStation. (Side note: us the ctrl functions to cut and paste, the buttons in Onstation don't work.) There are other programs available, such as Compass, WinKarst and CAPs. I've used Compass and its more difficult to get started than OnStation, but it is much, much more powerful. If you want to export to AutoCad or Illustrator, it does a much better job and without the conversion issues that Onstation has. It can also export a Google Earth file (*.kml) that zooms to the map on the aerial photos in Google Earth. You can send these to your cave diving friends and impress them with your maps! Click here for additional sites.
Copyright © 2001-2025 |


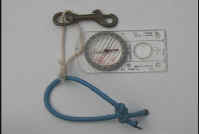 any outdoor shop. The one I use is shown here - the Suunto A30. Note the blue bungee strap that goes around the wrist. The braided nylon line attaches to the compass and has enough slack to allow the compass to be held comfortably in the left hand. The brass clip is to secure the compass inside a dry suit pocket so it doesn't get pulled out and lost inadvertently.
 The disadvantage to this approach is you have to juggle a compass, wet notes, pencil, and light, as well as all the tasks of cave diving. With time and practice it becomes second nature, but it can be a daunting task when you first begin.
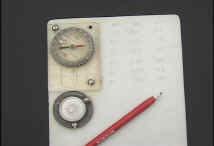 This slate has a compass and level mounted on it with stainless steel screws (stainless does not interfere with the magnetic field). If the slate is not level, the compass needle can get pinned inside the compass housing causing an incorrect reading. Without a level, I usually take the compass reading, re-level, and take it again. I may do this several times until I'm confident I have the correct reading.
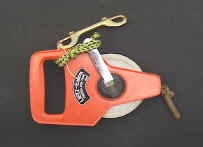 The surgical tubing attached to the end of the fiberglass tape replaces the normal metal hook. Gary Walton first showed me this trick while on a survey dive in Sac Actun in the Yucatan. The surgical tubing serves two purposes, one, it lets the tape float a little better so it is not dragging in the silt if it is dropped while reeling in. It doesn't eliminate it, but its better than a big chunk of metal. The second, is it can be tucked into wraps, behind line arrows, or with a clothespin so that your buddy doesn't have to hold the end. A quick jerk and the tubing will pop out and let you reel it back in.
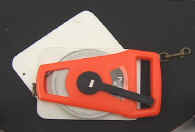 The 100 foot tape shown here is a good all around survey tape. This particular one has several slates attached to the back. Brett Hemphill made this modification so the slates can be folded out as information is gathered and then folded back in for storage.
 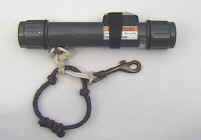 Another handy tool for surveying underwater is a sonar gun. You simply point the sonar gun at the wall, floor, or ceiling, hit the button, and read the distance from the display. Some models will hold the reading until the next is taken.